|


| ||||||||||||||||||||||||||||||||||||||||||||||||||||||||||||||||||||||||||||||||||||||||||||||||||||||||||||||||||

|
| ||||||||||||||||||||||||||||||||||||||||||||||||||||||||||||||||||||||||||||||||||||||||||||||||||||||||||||||||||


| 상품명 | 아마조나스 60X30 |
|---|---|
| 제조사 | 백투네이쳐 |
| 원산지 | 수입 |
| 판매가 | 180,000원 |
| 적립금 |
|
| 상품코드 | P0000BKW |
| 수량 |   |
| SNS 상품홍보 |
|---|

(최소주문수량 1개 이상 / 최대주문수량 0개 이하)
 수량을 선택해주세요.
위 옵션선택 박스를 선택하시면 아래에 상품이 추가됩니다.
| 상품명 | 상품수 | 가격 |
|---|---|---|
| 아마조나스 60X30 |


|
( |
| 총 상품금액(수량) : 0 (0개) | ||


아마조나스 60 X 30 입니다.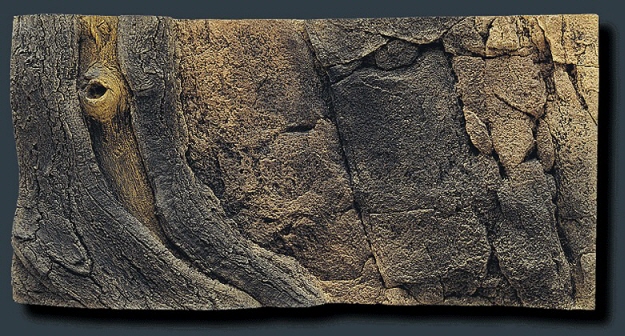
북남 아메리나의 아마존강 유역은 시클리드, 캣피쉬부터 군집을 하고 살고 있는 테트라류의 물고기에 이르기까지 아주 다양한 열대어들이 살고 있는 열대어의 보고라고 할 수 있습니다. 따라서 아마존에는 다양한 유목, 나무뿌리 등, 아주 다양한 서식지가 있으며, 이러한 열대어들의 자연 서식지의 일부가 되어있습니다.
아마존 백스크린은 이런 아마존의 모습을 마음속에 품고 제작되었고, 따라서 중앙에 놓여있는 뿌리의 그루터기등은 정말 자연스럽게 보일 수밖에 없습니다.
아마조나스 200 백스크린은 1994년 누렘버그에서 있었던 인터주에 처음 소개되었고, 그당시 엄청난 주의와 찬사를 받았습니다. 이때부터 이 백스크린은 다른 어떤 백스크린보다 더 사람들을 매료시켰고, 다른 백스크린보다 더 많은 공간이 필요함에도 불구하고 백스크린의 진정한 베스트셀러가 되었습니다.
아마조나스 60~160센티 모델들은 아마조나스 200처럼 그렇게 깊은 공간을 필요로 하지 않으며 상대적으로 작은 수조에도 아마조나스 백스크린을 설치할 수 있습니다.
그러나 아마조나스 200 백스크린은 깊이가 최소한 70센티이상(더 깊을수록 좋습니다.)되어야 하며, 나머지 아마조나스 80~160센티 모델들은 45센티 정도의 깊이를 가진 어항에도 충분히 설치될 수 있습니다.
60센티인 아마조나스는 최소한 25센티이상 수조에 설치가 용이합니다.
아마조나스 제품군은 다음과 같습니다. Amazonas 200x60
 Amazonas 160x60
 Amazonas 150x50
 Amazonas 130x50
 Amazonas 120x50
 Amazonas 100x50
 Amazonas 80x40
 Amazonas 60x30
다음은 입체백스크린 설치 사진입니다. 영어로 되어있지만 그림만 보셔도 대충의 과정을 이해하실 수 있을 것입니다.
These are a step-by-step instructions on how to install a Back to Nature background in an aquarium.
These instructions show you how you install a BTN Amazonas background with dimensions of 150x50 cm in an aquarium (150x50x50 cm) with a dome-shaped front glass. The instructions also apply to BTN-backgrounds in other sizes as well as for the Rock series of backgrounds.
2 tubes of black aquarium silicon - silicon pistol, 2 waterproof felt pens - folding ruler - handsaw - hammer - knives - drill - drill bits - brush - lighter - straight strip of wood (app. 100 cm) - peat (fine-grained) - filter material (filter foam sheets 100x100x5 cm) - materials used to raise the background (see point 12) - pump - 2 glue clamps and 1 screw clamp if needed. 
1. Equipment necessary for the installation.
2. If the aquarium has a stabiliser-strip (brace), remove this first. This can sometimes be rather difficult and may take a while. Use knives or similar tools with very thin blades.
3. Place the background behind the aquarium with the left side (or the right side, whichever has the straighter edge) slid a few millimetres (the thickness of the aquarium glass) in, so it's placed in line with the inside of the aquarium.
4. Move to the right side and first mark the aquarium in line with the outside of the aquarium.
5. Next, make a new mark which is in line with the inside of the aquarium. In this case, 12 mm (the thickness of the aquarium glass) inside the outer mark (see point 4).
6. Now move the background a bit to the right again, and draw a vertical line that starts at the mark you made under point 5. Use a felt pen that is attached to a strip of wood. Use the aquarium for support.
7. The lines are now complete.
8. Place the handsaw at a right angle to the background. Sawing should be done just along the inside of the line.
9. Saw the background all the way through. When you are finished, check to make sure the background fits inside the aquarium. If not, you will have to adjust it using a plane or a coarse file.
10. If you like, you may also saw the background so that it doesn't protrude one or two centimetres above the top of the aquarium. Measure the distance down to the strip of glass on the inside of the aquarium (if there is one).
11. Measure the same distance on the background and make a mark with the felt pen.
12. Place the background behind the aquarium once again and lift the background to an equal height on both sides (we have used some brochures to do this here) so that the felt pen will be level with the line. Draw a line along the length of the background.
13. Now it's time to saw.
14. Drill a hole (diameter 60-75 mm) for the water inlet. Normally you can buy this type of drill rather inexpensively at a D.I.Y-store. You may also always just drill a smaller hole first, and then cut out a larger hole using a knife.
15. Place a grill in the hole or look at "Tip" for other possibilities.
16. Now drill a hole for the water outlet. Use a drill bit with the same diameter as the outside diameter on the hose that fits onto the pump.
The hole should be drilled horizontally approx. 3 cm below the water level (you will have to estimate where the water level will be). If you would like more oxygen-rich water in the aquarium, you can drill the hole 1 cm closer to the water level, or alternatively in such a way as to ensure that the hole is angled a few millimetres upwards (the highest part should be at the front of the background).
17. Mark where the stabiliser strip will be. If your aquarium does not come equipped with a stabiliser, skip steps 18 through 24 and go directly to point 25.
18. Saw two slits behind the marks. Hammer out the section between the two slits using a hammer and a sharp knife and check to make sure the stabiliser fits in this space.
19. The situation in this aquarium is particularly complicated since the stabiliser strip in this type of aquarium is placed under the longitudinal strips of glass and as a result, we must saw extra deep into the background. This situation is unusual so if it doesn't apply to you, skip steps 20 through 23 and go directly to point 24. 
20. Using the knife and the hammer, create some deep slits in the background.
21. Using the hammer, hammer out the middle section.
22. Check to make sure the stabiliser fits and then glue it. Hold the stabiliser in place using two glue clamps (see photo 23).
23. Check to make sure that the piece of the background that was removed fits, and glue it back in place.
24. Glue the stabiliser. 25. Decide exactly where you would like to place the background in the aquarium. Then fasten the background in this position using strips of material (part of the background as we have done here, or a piece of wood) on both the left and the right sides on the bottom of the aquarium. If necessary, you will also need a screw clamp on the top.
26. Glue the background onto the sides of the aquarium using black aquarium silicon. Check to make sure that the silicon goes all the way from the bottom of the aquarium to the top; otherwise small fish might be able to swim behind the background. Check to make sure that the silicone goes all the way from the bottom of the aquarium to the top to prevent tiny fish from swimming behind the background. Sometimes it is difficult to reach everywhere with the silicon tube. If so, bend the tip of the silicone tube - see "Tip" for more details. 
27. Press peat into the silicone.
28. Glue the background to the bottom of the aquarium.
29. The sides of the aquarium behind the background should be covered with black adhesive plastic or be painted black.
30. The background is now installed and you may now decorate the aquarium as you like. When you decorate the aquarium you may place a few stones, plants or a piece of wood in front of the hole and the hole will disappear "completely." It is possible to place the filter material behind the background. See "Tip" for an example of how you may best do this.


company : 탕가니카코리아 대 표 : 김주대 [사업자정보확인] 사업자등록번호 : [129-32-41579] 통신판매업신고 제 2020-성남분당B-0110
Tel : 0505-355-1004 Fax : 0505-475-1004 Address : 13610 경기도 성남시 분당구 느티로51번길 4-12 (정자동) (구주소:정자동 86-7번지)
개인정보보호관리책임자 : 김주대(wnekdl@naver.com)
Contact wnekdl@naver.com for more information. Copyright © 청담아쿠아. All rights reserved.